This article is a part of the .NET MAUI UI July calendar—a month-long list of content around .NET MAUI from the developer community, curated by Matt Goldman.
There are many potential criticisms of XAML. Some people want to abandon it entirely and just use C# to create their UIs. I think that introduces other issues (that I'll expand on in a future blog post), but it also doesn't do anything for the people who like working with XAML and/or already have a lot of it, and for whom completely rewriting that code isn't an option.
Rather than write XAML off, or sit and complain, I'm interested in different ways of writing XAML that address some of the criticisms and in providing tools to make it easier.
This post is about one such new tool. I was excited to try it out and have been impressed by the difference it's made to my coding (once I'd gotten used to working in a different way).
Firstly, two pieces of background:
1. About 20 years ago, I was involved in hiring a web developer. (Obviously, web development has changed massively since then, but this story is still relevant.) One of the people we interviewed was really keen on pointing out how they thought it was important that they wrote everything by hand and didn't use an IDE with any tooling that made writing code easier. I don't agree with this attitude, and that's probably part of the reason I still remember the conversation (especially given how bad at remembering other things.) Yes, it's great to have full knowledge of a topic and be able to do something without assistance, but that assistance may save valuable time. If you have someone with deep or expert knowledge, isn't it better to have them focus on the tasks that use that knowledge rather than simple tasks that could be automated or accelerated?
2. Reading one of the many threads about developer frustration with the lack of tooling for WinUI3, I was prompted to think again about the Toolbox inside Visual Studio. Someone was complaining that the Toolbox isn't populated for WinUI3 projects. Having not used a drag-and-drop interface designer for many years, I'd only really thought about the Toolbox as a place to store code snippets. What if it could be useful for writing code directly in the editor too?
This is the Toolbox window (initialized within a .NET MAUI project) - it has groups (Controls, Layouts, Cells, and General) and items within each group.

That it's also possible to add arbitrary pieces of code (AKA snippets) into the toolbox made me think about the other snippets that are supported by Visual Studio.

These two types of "snippets" got me thinking:
- Snippets in the toolbox are visual (and so more easily discoverable) but limited in functionality.
- "Code snippets" have more functionality but aren't visible/discoverable.
What if there was a way to combine the two?
Before I continue, I should probably point out something many developers aren't aware of. You can use the items in the Toolbox with the XAML editor? (or any editor window.)
- You can drag an item onto the editor, and it will add the XAML for the control at the point where you drop the item.
- If you double-click on an item and it will add that same XAML wherever the cursor is.
🤯
Give it a try:
Open a new .NET MAUI project and drag a Button onto the editor. You'll see it adds the following:
<Button Text="" />
Or, double-click on the ListView and see it adds the following:
<ListView><ListView.ItemTemplate><DataTemplate></DataTemplate></ListView.ItemTemplate></ListView>
That's good, but it puts the cursor after the closing element. Not if you then want to add content to the DataTemplate.
Notice also that the items in the Toolbox don't include some of the things you're likely to use most in a .NET MAUI codebase. I suspect that this list is actually from the historic Xamarin.Forms functionality still in the underlying code base.
Perhaps I can do something "better"?
Introducing Pro XAML Toolbox
It's only one window, but here it is in dark and light themes.

Ok, it doesn't look like much, but let me explain. [prefer to watch rather than read? - see this video]
It's an intended replacement for the built-in Toolbox when it comes to working with XAML in a .NET MAUI project.
The main goal is to get boilerplate code written faster. This can then be modified as necessary for the requirements of an individual app.
Boilerplate code is often challenging to work with, and different approaches are taken to remove or work around it. I'm not able to change the language, so it's not needed, and for XAML, there isn't an easy way to use code generation or compiler trickery to make it unnecessary. So, I've chosen to try and make it so that there's less need to type it yourself.
Let's look at a couple of examples.
Example 1 - A login screen
Imagine you wanted to create a login screen like this: It has an image at the top, two input fields for the username and password (each with a label above), one button to "sign in", and one for if the person has forgotten their password.
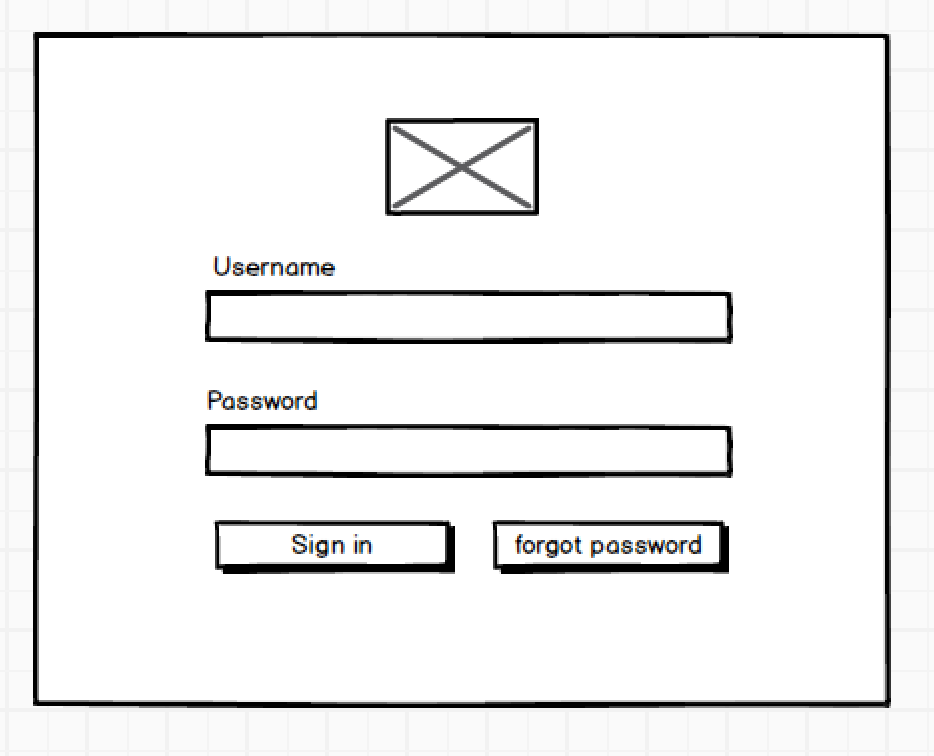
If you're familiar with .NET MAUI and writing XAML this probably doesn't look too complicated to implement. You're right. It shouldn't be hard to implement this. You could create this quite quickly and without too much thought.
However, it's even easier and faster to create the basic scaffolding of this UI with the Pro XAML Toolbox.
All you need to do is set the cursor in the editor and then double-click on the appropriate items in turn.
That's: VerticalStackLayout > Image > Label > Entry > Label > Entry > HorizontalStackLayout > Button > Button
So, nine items double-clicked, and it produces all this code (here shown formatted):
<VerticalStackLayout>
<Image Source="PATH-TO-IMAGE" />
<Label SemanticProperties.HeadingLevel="Level1" Text="CHANGEME" />
<Entry Placeholder="CHANGEME" Text="{Binding PropertyName}" />
<Label SemanticProperties.HeadingLevel="Level1" Text="CHANGEME" />
<Entry Placeholder="CHANGEME" Text="{Binding PropertyName}" />
<HorizontalStackLayout>
<Button
Command="{Binding CommandName}"
SemanticProperties.Hint="Add a description of what happens when clicked"
Text="click me" />
<Button
Command="{Binding CommandName}"
SemanticProperties.Hint="Add a description of what happens when clicked"
Text="click me" />
</HorizontalStackLayout>
</VerticalStackLayout>
If I started to create this myself and only used the keyboard, 9 keystrokes gest me this much code:
<VerticalStackLayout>
<Image Source=""
</VerticalStackLayout>
I've clearly saved a lot of keystrokes and, therefore, time. Also, possibly, a bit of mental effort too.
It's not just the amount of code I've gained. I did it all without having to move the cursor. When I added an element likely to have child elements, the cursor was automatically positioned accordingly.
I've also got attributes for the properties I'm likely to need to set, and there are suitable default values with prompts to change them too.
Example 2 - A list with an item template
Here's another common scenario. We want a templated list, and each item in the list should contain an image with two pieces of related text beside it.
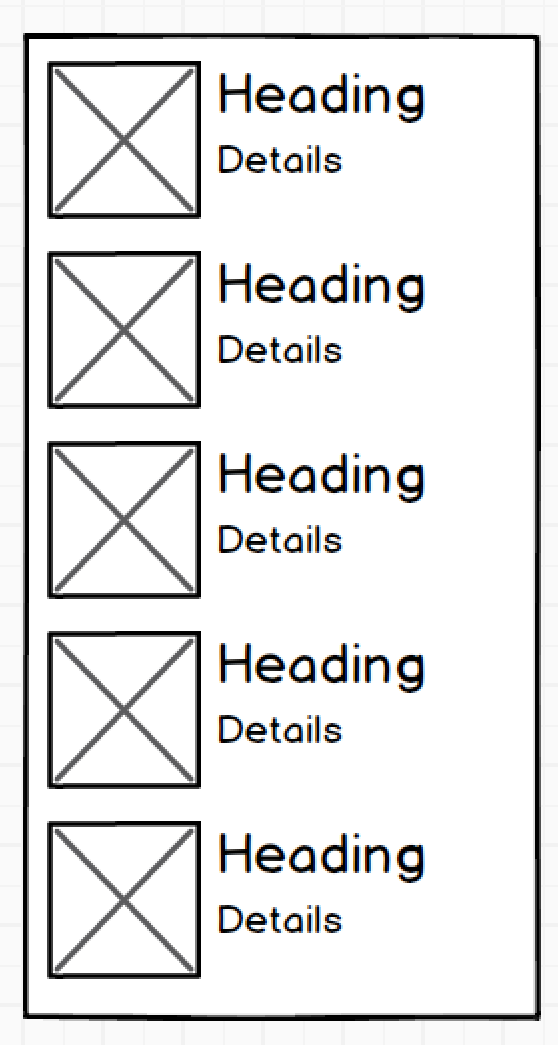
Again this is very simple to create yourself, but you shouldn't have to write it all by hand.
Let's set the cursor in the desired position and double-click some items in the Pro XAML Toolbox.
CollectionView > Grid > Image > VerticalStackLayout > Label > Label
That's six items that we've double-clicked, and it's provided all this code (again, line breaks and formatting have been added):
<CollectionView
ItemsSource="{Binding PropertyName}"
SelectionChangedCommand="{Binding CommandName}"
SelectionMode="Single">
<CollectionView.ItemTemplate>
<DataTemplate>
<Grid ColumnDefinitions="*,*" RowDefinitions="Auto,Auto,*">
<Image Source="PATH-TO-IMAGE" />
<VerticalStackLayout>
<Label SemanticProperties.HeadingLevel="Level1" Text="CHANGEME" />
<Label SemanticProperties.HeadingLevel="Level1" Text="CHANGEME" />
</VerticalStackLayout>
</Grid>
</DataTemplate>
</CollectionView.ItemTemplate>
<CollectionView.EmptyView>
<ContentView>
<StackLayout HorizontalOptions="CenterAndExpand" VerticalOptions="CenterAndExpand">
<Label Text="Nothing to see here." />
</StackLayout>
</ContentView>
</CollectionView.EmptyView>
</CollectionView>
Notice how the Grid is automatically put inside the DataTemplate and the Image inside the Grid.
I tried to type the above by hand and got this far with 6 keystrokes:
<CollectionView I
Intellisense helped a bit, but that's as far as I got. :(
But, you might point out, the generated code isn't finished!
No, but it is ready for you to make the specific tweaks you need. This could be removing the RowDefinitions from the Grid and specifying the Column that the VerticalStackLayout should be in. Both of which are trivial. And then you'll need to replace the placeholder text, but again that's easy. Yes, easier than typing the whole thing yourself.
Your value is in producing finished software that provides value to those who use it.
Your value is not in the number of keystrokes you make or the amount of code you write.
Options/Configuration
But what if the generated code shown above isn't to your liking or preference? - You can configure it.

Prefer to use events rather than commands? It's an option.
Don't want to include common (or recommended) accessibility/semantic properties? You don't have to.
Want every element to have an 'x:Name'? You can.
And the options to change these while you work are always accessible (not hidden away in a separate place), so you can easily and quickly change them while working on a file.
If (and when) there's some magical tooling (AI?) that can automatically give you everything you need to create a desired UI, then great. I'll happily use it.
For now, and until then, we can write code and build software much faster by using tools that do the easy, generic, and standardizable bits for us.
No, it's not the same as having a visual designer (something I know many people want, but Microsoft aren't likely to provide any time soon), but it's much faster than writing all that code by hand!
My hope is that others will find this useful too.
- It's not a panacea or a silver bullet.
- You don't have to use it.
- It's not perfect for everything - I still write XAML by hand as well as using this.
- It doesn't remove the need for other tools. (I have other tools to generate code in different ways)
- But it could be another tool in your (pardon the pun) toolbox to help you create high-quality software faster and more easily.
Please install it, try it out, and let me know your thoughts.
I've already created issues to track some of the things I'd like to add and would love for you to add your ideas too.
And yes, there is likely to be WinUI/UWP and WPF support coming soon if other people want it.